Overview
This article describes the process to ensure that the volumes are mounted correctly and to fix them when they are listed as not mounted. This issue is common for old systems and happens when the software loses sync with an HDD, which is still physically connected.
Process
Please perform the steps below in the provided order.
Step 1 - Checking That the Volumes Are Mounted (CLI)
-
Using SSH, connect to the management IP of the server and enter the padmin credentials.
-
Enter the
su admincommand to access the CLI console. If you cannot access the console, try to use the root credentials by enteringsu -.root@<MANAGEMENT_IP> /home/padmin # su admin
Cli version - 6.2.2b601
Snmp version - PeerApp UltraBand software version 6.2.2b601 -
Run the command
show systemidto get the management service tag.console> show systemid
*99WHZG2 -
Run the
enablecommand and enter the first service tag (without the asterisk) displayed in step 3 as the password.console> enable
Password:99WHZG2 -
Type
show statusand press Enter to get a confirmation if the Device state is started:console# show status
Operational state Device state Administrative state
enabled started unlocked -
Type
show volumesand press Enter to get information on the state of each volume:console# show volumes
Configured volumes : 0
Volume name State Owner
/mnt/vol1 mounted ce-1
/mnt/vol2 mounted ce-1
/mnt/vol3 mounted ce-1
/mnt/vol4 mounted ce-1
/mnt/vol5 mounted ce-1
/mnt/vol6 mounted ce-1
/mnt/vol7 not mounted
/mnt/vol8 mounted ce-1
/mnt/vol9 mounted ce-1
/mnt/vol10 mounted ce-1
/mnt/vol11 mounted ce-1
/mnt/vol12 mounted ce-1
/mnt/vol13 not mounted
/mnt/vol14 mounted ce-1
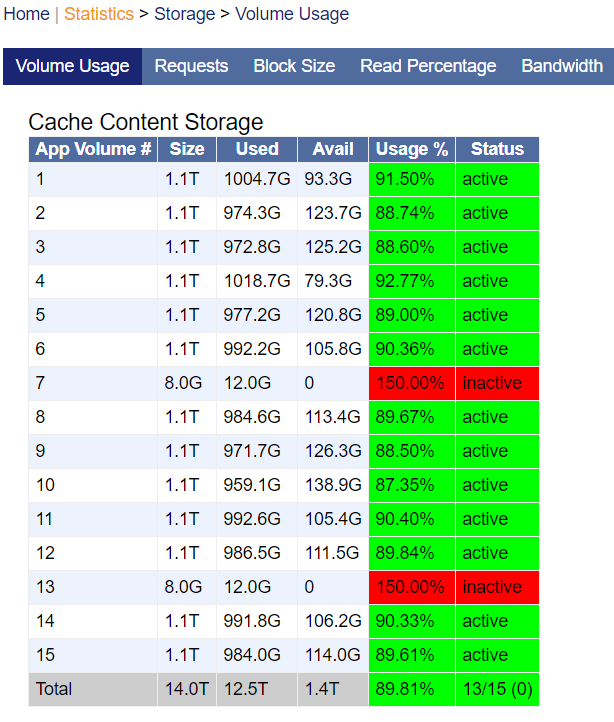
/mnt/vol15 mounted ce-1From the sample output, you can confirm that the volumes 7 and 13 are not properly mounted.
Step 2 - Checking Volume Usage and Status Using the GUI
You can also confirm the volume status by accessing the Graphical User Interface (GUI) via the following link (you will need the management IP address):
https://<MANAGEMENT_IP>/ui/statistics/storage/volume_usage
Step 3 - Checking Disks Availability for PeerApp Cache to Use
Run the /opt/pang/bin/fdisk.sh script that shows if the disks are available to be used by PeerApp Cache:
root@<MANAGEMENT_IP> /home/padmin # /opt/pang/bin/fdisk.sh
PeerApp,0001,U      /dev/sdh1
PeerApp,0002,U      /dev/sdg1
PeerApp,0003,U      /dev/sdf1
PeerApp,0004,U      /dev/sde1
PeerApp,0005,U      /dev/sdd1
PeerApp,0006,U      /dev/sdc1
PeerApp,0007,U      /dev/sdi1
PeerApp,0008,U      /dev/sdo1
PeerApp,0009,U      /dev/sdn1
PeerApp,0010,U      /dev/sdm1
PeerApp,0011,U      /dev/sdl1
PeerApp,0012,U      /dev/sdk1
PeerApp,0013,U      /dev/sdj1
PeerApp,0014,U      /dev/sdp1
PeerApp,0015,U      /dev/sdq1
PeerSSD,0241,U      /dev/sdr1
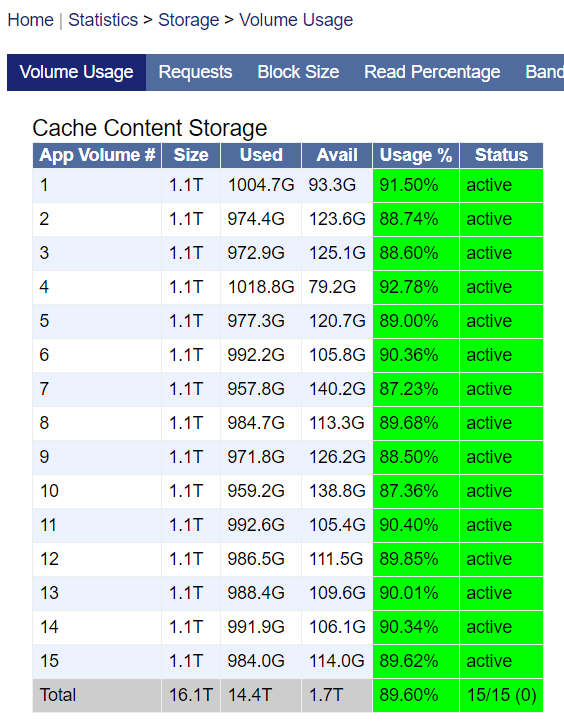
The sample above shows that all volumes are mounted (even volumes 7 and 13).
If the fdisk script does not show the affected volumes, do not follow the rest of the process. There could be a physical disk failure or any other issue that needs to be escalated. To verify if there is a disk failure, please refer to the PeerApp System Status Degraded Due to a Physical Disk Error article.
Step 4 - Correcting Affected Volumes
Execute the CLI commands in the following order for each of the affected volumes.
-
Type
cache volume deactivateand press Enter. Type the required volume number when prompted.console# cache volume deactivate
Configured volumes : 0
Please enter volume number <1-240>7
Deactivating volume 7
console# cache volume deactivate
Configured volumes : 0
Please enter volume number <1-240>13
Deactivating volume 13Wait for one minute before performing the next step.
-
Type
cache volume activateand press Enter. Type the required volume number when prompted.console# cache volume activate
Configured volumes : 0
Please enter volume number <1-240>7
Activating volume 7
console# cache volume activate
Configured volumes : 0
Please enter volume number <1-240>13
Activating volume 13
Step 5 - Checking That the Volumes Are Now Properly Mounted (CLI)
Type show volumes and press Enter to recheck the status of the volumes:
console# show volumes
Configured volumes : 0
Volume name        State         Owner
/mnt/vol1          mounted       ce-1
/mnt/vol2          mounted       ce-1
/mnt/vol3          mounted       ce-1
/mnt/vol4          mounted       ce-1
/mnt/vol5          mounted       ce-1
/mnt/vol6          mounted       ce-1
/mnt/vol7          mounted       ce-1
/mnt/vol8          mounted       ce-1
/mnt/vol9          mounted       ce-1
/mnt/vol10         mounted       ce-1
/mnt/vol11         mounted       ce-1
/mnt/vol12         mounted       ce-1
/mnt/vol13         mounted       ce-1
/mnt/vol14         mounted       ce-1
/mnt/vol15         mounted       ce-1
Step 6 - Checking the Volume New Status Using the GUI
You should see the same result if you check through the GUI. Please take into account the Statistics menu in the graphical interface is not updated in real-time, so there can be a delay since the volumes are activated using the CLI until they show active in the GUI.
https://<MANAGEMENT_IP>/ui/statistics/storage/volume_usage
Additional Step
To avoid this issue, you can use a dual-link configuration for the iSCSI connection when one of the iSCSI links is not connected.
Priyanka Bhotika
Comments